How to regrow vegetables at home

Regrowing%20veggiesDid you know that you could regrow vegetables at home? It’s much easier than you think — and you don’t need to have a green thumb!

You can grow them indoors or move them outside and plant in soil. Just make sure you use fresh scraps and give them enough water and light.

Click here for more tips!

 a0a5b8ae75203ab18bd322bbd8751cdb

Gourmet grilled cheese sandwiches

slide_361906_4062778_freeLately, I have been eating a lot of grilled cheese sandwiches from a small, local shop in downtown Brampton. It’s conveniently located near my work, and best of all, the food is home-made and super fresh.

They have a variety of grilled cheese sandwiches, but the pear, pecan and brie one is my all-time favourite! It’s crispy on the outside, gooey and warm on the inside, and crunchy with a sweet aftertaste.

Since I can’t eat out all the time – it’s just not wallet-friendly – I decided to try making gourmet sandwiches at home.

Here is a link to some AMAZING grilled cheese sandwich recipes.

Most are fairly quick and easy to make and there isn’t a lot of preparation involved. So go ahead, give them a try and upgrade your boring sandwiches!

Tips on how to make the best grilled sandwiches:

  • slide_361906_4103121_freeUse a non-stick pan so the cheese doesn’t stick and it makes flipping easy. (I use a Panini grill and it works just fine)
  • Butter the bread, and not the pan, to get a good crust. Don’t forget to butter the edges!
  • You can try using olive oil instead of butter for a different flavour.
  • If you’re using a block cheese – like cheddar or mozzarella – grate it, instead of slicing it, to make it melt faster.
  • When you first put the sandwich in the pan, let it cook for about a minute to get crispy, then cover it to melt the cheese. Once melted, remove cover and flip to get both sides crispy.


BBQ Tips and Tricks to Grill like a Pro

BBQ GrillWith the Canadian Victoria Day long weekend here, there’s no better time than now to pull out your BBQ. I love BBQ season! Aside from the fact that I don’t have to cook as much – my husband does all the grilling – we get to spend more time out on the deck, enjoying the beautiful weather.

Learn how you can BBQ like the pros with these handy tips and tricks.
brush

Prep the grill
If your BBQ hasn’t been used for months, then it’s time for a good cleaning. If there’s food buildup, you’ll first need to remove it with soapy water. It’s best to do this ahead of time.

Once you’re ready to grill, get a long-handled wire grill brush and clean each bar. According to the experts, it’s best to scrub the grill when it’s hot. Don’t forget to brush again after you’re done grilling.oiling

Gather your tools: tongs, spatula, food thermometer, grill basket, mitts, etc.

Meat tends to stick to the grill, so it’s best to use a paper towel soaked in vegetable oil and wipe it across the grill using tongs (not your hands!).


Marinade
marinadeWho likes plain, bland meat? Not me! Marinating infuses the food with rich flavours and aromas – and it’s not only for meat. Marinades with sugar should be added at the end so it doesn’t burn. Marinades with acid (citrus juice, vinegar) will cook the protein faster. You will need to let the food sit in the sauce for a few hours to maximize the flavour. Or, you can just rub the meat with sauce while it’s on the grill.

You can also marinade tofu and veggies to give them an added kick. Get creative! BBQ is fun and you can’t really go wrong – well sort of, but still go ahead and experiment.


Sizzle

basketOnce the grill is hot and oiled, it’s time to add your meat. If you’re adding veggies, use a metal basket so they don’t fall through the bars. Try not to move the food around a lot. Close the lid and let it cook for a few minutes before you flip. Pull out the food thermometer and test your meat to make sure it’s cooked on the inside.


Good to know:

  • Have a spray bottle full of water ready in case of flare-ups
  • Wash your hands after touching raw meat to avoided cross-contamination and don’t use the same plates for cooked meats
  • Avoid using salt until the meat is cooked. Otherwise you’ll end up with dry and tough meat, as salt draws out moisture
  • Soak wooden skewers in water for 15 minutes before adding food. This will prevent the wood from burning
  • Use tongs or a spatula to turn meat. Piercing with a fork causes juices to escape
  • Chicken doesn’t need as much time to cook as red meat, so keep an eye on the grill
  • Marinade Recipes
  • Chicken Recipes
  • Grilled Fruit Recipes

A Rainbow of Lentils

img_2509Lentils are a hidden gem! Not so hidden in Asian cultures, but definitely underrated.

When I first started cooking, I was intimidated by them. There are so many different types – different sizes and in a rainbow of colours.

Lentils are legumes and grow in pods that contain either one or two small, round/oval-shaped seeds. They’re sold at most grocery stores and come in either whole or split seeds.

Lentils taste pretty neutral and absorb the flavour added to them, which makes them perfect to add into any diet or recipe. But it’s the health benefits that make lentils a superfood! They help lower cholesterol and are an excellent source of B Vitamins and protein. And best of all, they’re almost fat-free!

Cooking with lentils
lentilsinfo
Surprisingly, just like dried beans, they’re fairly easy to make and incorporate into your diet. Lentils can be used in soups, salads, wraps, made into burger patties, and much more! Check out this amazing website full of endless recipes.

Lentils need to be rinsed first and then boiled in a lot of water – about 30-40 minutes depending on the quantity and type. After that, all you need to do is season them (or add in veggies) and you’re good to go. Remember, lentils double and triple in size, so make sure you use a large pot.

Here’s the link for the yellow lentil with spinach recipe shown in the picture. I cut down on the amount of spices and butter to make it a less spicy version for my toddler. My daughter loved it and didn’t even mind the spinach, which she wouldn’t normally eat on its own.

Sometimes, when I’m short on time, I mix a couple of different types of lentils and put them in a pressure cooker to expedite the cooking process.

So go ahead and explore the colourful world of lentils!


Healthy Butter Chicken

Butter ChickenUmm, wait, is there even such a thing as healthy butter chicken? Probably not, so let’s just go with less-fattening, cream-free, yet still flavourful butter chicken!

Butter chicken is a classic Indian dish loaded with cream and butter. It’s a warm, hearty comfort food that’s simply irresistible.

I believe in the idea of not depriving yourself in order to stay healthy – it’s all about moderation. So here’s my version of butter chicken. It still has that authentic taste, but it’s easier to make and has a lot less calories.

Ingredients:

1 tablespoon of butter
1 finely chopped onion
1 tablespoon finely chopped garlic
Half can tomato paste
Ingredients2 cups tomato puree/sauce
1 teaspoon salt
1 teaspoon cayenne pepper
1 teaspoon garam masala
3 cardamom, ground up
1 cup of milk (or if you want to go all in, use full fat milk or heavy cream)
3 large chicken breasts, cubed
1 tablespoon vegetable oil
2 tablespoons tandoori masala

IMG_2720Directions:

Start by mixing cubed chicken with vegetable oil and tandoori masala. Let it sit and marinate (the longer the better, so you can do this ahead of time and refrigerate)

Next, melt butter in a deep pan over medium heat. Stir in onion and cook slowly until it caramelizes to a brown colour, about 5 minutes. Add garlic and cook for about a minute.IMG_2714

Then, add tomato sauce and paste, salt, cayenne pepper, ground cardamom, garam masala and milk or cream and mix well. (At this point, to make it restaurant style, you can take the sauce and blend it to infuse the flavours and get that bright orange colour. Then, remove from blender and pour back in pan.)

Cover and bring the sauce to a medium-low simmer for about 20 minutes, stirring occasionally.IMG_2717

Next, add in the marinated chicken. Mix well. Cover and simmer for another 10-15 minutes (until chicken is cooked), stirring occasionally.

Serve over a hot bowl of white rice or with fresh naan bread. Garnish with fresh coriander, drizzled cream or green chillies.

This recipe makes about 3-4 servings.IMG_2726


Tips:

  • With the milk, you may notice a bit of curdling, so you can try heating it first. You won’t have that issue with heavy cream, but since this is a healthier option, it’s not a big deal and won’t impact the taste.
  • The longer you let the sauce simmer on low heat, the better the flavour.
  • You can also marinate the chicken in a yogurt and masala mixture, cook in the oven and then toss into the sauce last minute.
  • Cardamom makes a huge difference so try not to skip it. You can find it at most stores in the ethnic aisle.
  • The tandoori masala has a little kick to it so if you can’t handle the spice, then reduce the amount of cayenne pepper. You can always adjust the seasoning at the end.


Butternut Squash Pancakes

IMG_2444In my endless quest to feed my toddler healthy meals, I’ve come across another winning recipe.

IMG_2442It’s a basic pancake, but with butternut squash in it.

Here’s the link to the recipe. I ended up roasting and mashing an entire squash, since I didn’t know what to do with the remainder. And boy, oh boy, did I end up making a massive batch! I took the remaining batter and froze it, hoping to use it at a later day (not sure if that was a smart idea – I’ll find out soon enough!).

As you can see in the photo, the batter looks a bit unappetizing, but the final product is delicious. I skipped the maple syrup, since I prefer not to feed my daughter sugar.

In the end, my daughter ate it – without throwing it – and that’s all that matters to me. Happy mommy! 🙂

Thai curry in a hurry

IMG_2094I love Thai food! And as much as I enjoy eating out, I would have never thought to attempt making any Thai food at home. But the other day, I was craving Thai curry… The spicy red one to be exact.

As much as I would like to make it from scratch, let’s be realistic, I’m no Martha Stewart! The long list of ingredients scares me – like, what’s galangal?

So off I went to the ethnic aisle of my favourite grocery store, only to be overwhelmed by the choices! Do I buy the paste or sauce? Which brand is better? In the end, I bought two. I made both a couple of weeks apart and here’s what I thought:IMG_2096

Thai Kitchen Red Curry Paste
– needs to be used with coconut milk
– tastes more spicy, but less salty

VH Red Curry Sauce
– doesn’t need coconut milk (but I still added a quarter can)
– tastes a bit sweeter
IMG_2095– is more creamier in texture

Here’s my quick and easy (fool-proof) recipe for Thai curry.

 You will need:

  • 2 tablespoons of oil
  • A curry paste/sauce (either VH or Thai Kitchen…or another good brand if you have one)
  • One can of coconut milk
  • 2 cups of frozen Asian vegetables
  • Protein (1 pack of firm tofu or 2 chicken breasts)

 IMG_2098Directions:

  1. Start by dicing your protein. I prefer to cut them into one-inch cubes.
  2. Heat oil in a wok, or a deep skillet, on medium-high heat. Add the tofu and fry until it’s a bit golden. Similarly, cook the chicken until it is no longer pink.
  3. Add in about 2 tablespoons (I use about 3 tablespoons since I like it intense!) of the curry paste and entire can of coconut milk (or entire jar of VH sauce, no need for coconut milk). Stir until it’s all mixed.
  4. Bring to a boil.
  5. Add in the veggies (don’t overcook; you want the veggies to still be crunchy).
  6. After about 5 minutes, turn off the heat.
  7. Serve with a bowl of steamed white rice.

This recipe makes enough for 4-5 people.

Baked Avocado Fries

IMG_2355I love avocados. They’re very healthy and easy to eat on the go – definitely my kind of food!

I saw this recipe for baked avocado fries and instantly fell in love with the photo that accompanied it. I may have been drooling actually! That creamy, crunchy goodness…yum!

So, naturally, I had to try it out.

IMG_2343-0Here’s the original recipe. The ingredients are minimal (avocados, flour, eggs, Panko crumbs, seasoning) and it took about 25 minutes to make. I have to admit it was a bit messy, but worth it in the end.

IMG_2345-0Once I pulled them out of the oven, they were golden and crunchy. I wasn’t sure if the heat would make them mushy, but the avocados held their shape, so it was nice and firm.

I ate them with some Sriracha mayo, which gave it that extra kick. Next time, I would add more spices and herbs straight in the flour for more flavour.

Bon appetite! 

Baked Cauliflower Tots

IMG_2021Yesterday, after coming home from work, and with only one hour to make dinner, I found myself lost. I looked inside the fridge only to find a big, white head of cauliflower staring back at me. I thought about steaming it alongside a bed of rice and salmon, but wanted to make something easier and more importantly – different! So off I went online and landed on Pinterest. I came across a recipe for tots. But with cauliflower? Sure, why not!

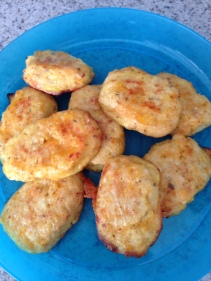
I made a few changes and ended up with these golden fluffy chunks with cheddar cheese on the inside, and best of all, my toddler loved them! It took about an hour, and only because I had to prepare the cauliflower. But if you do that ahead of time and freeze it, the baking only takes about 20 minutes. I’m definitely saving this recipe and making it again.


Here’s my adapted recipe:

1 head of cauliflower, washed and broken into florets

1 large egg

¼ cup breadcrumbs (I used Italian breadcrumbs but any will work)

¼ cup cheddar cheese

Salt, black pepper and garlic power to taste

Optional: red chilli peppers, oregano, finely chopped onion and bell peppers for an added kick


Directions

IMG_2013Preheat oven to 375F. Take a baking sheet and line with parchment paper. Set aside.

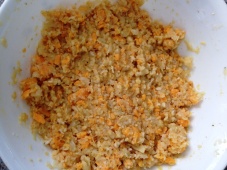
Take your washed cauliflower and start grating the florets with a cheese grater. If you have a food processor, that works well too. You should have something that looks like fluffy rice. Take the “rice” cauliflower and place it in the microwave for about one minute to steam (you may need to put it in longer depending on your settings).

Now here’s the fun part. Once it’s a bit cool, dump it on a cheesecloth and squeeze out the water.

IMG_2015Put the “rice” back in a bowl and combine the rest of the ingredients. That’s it!

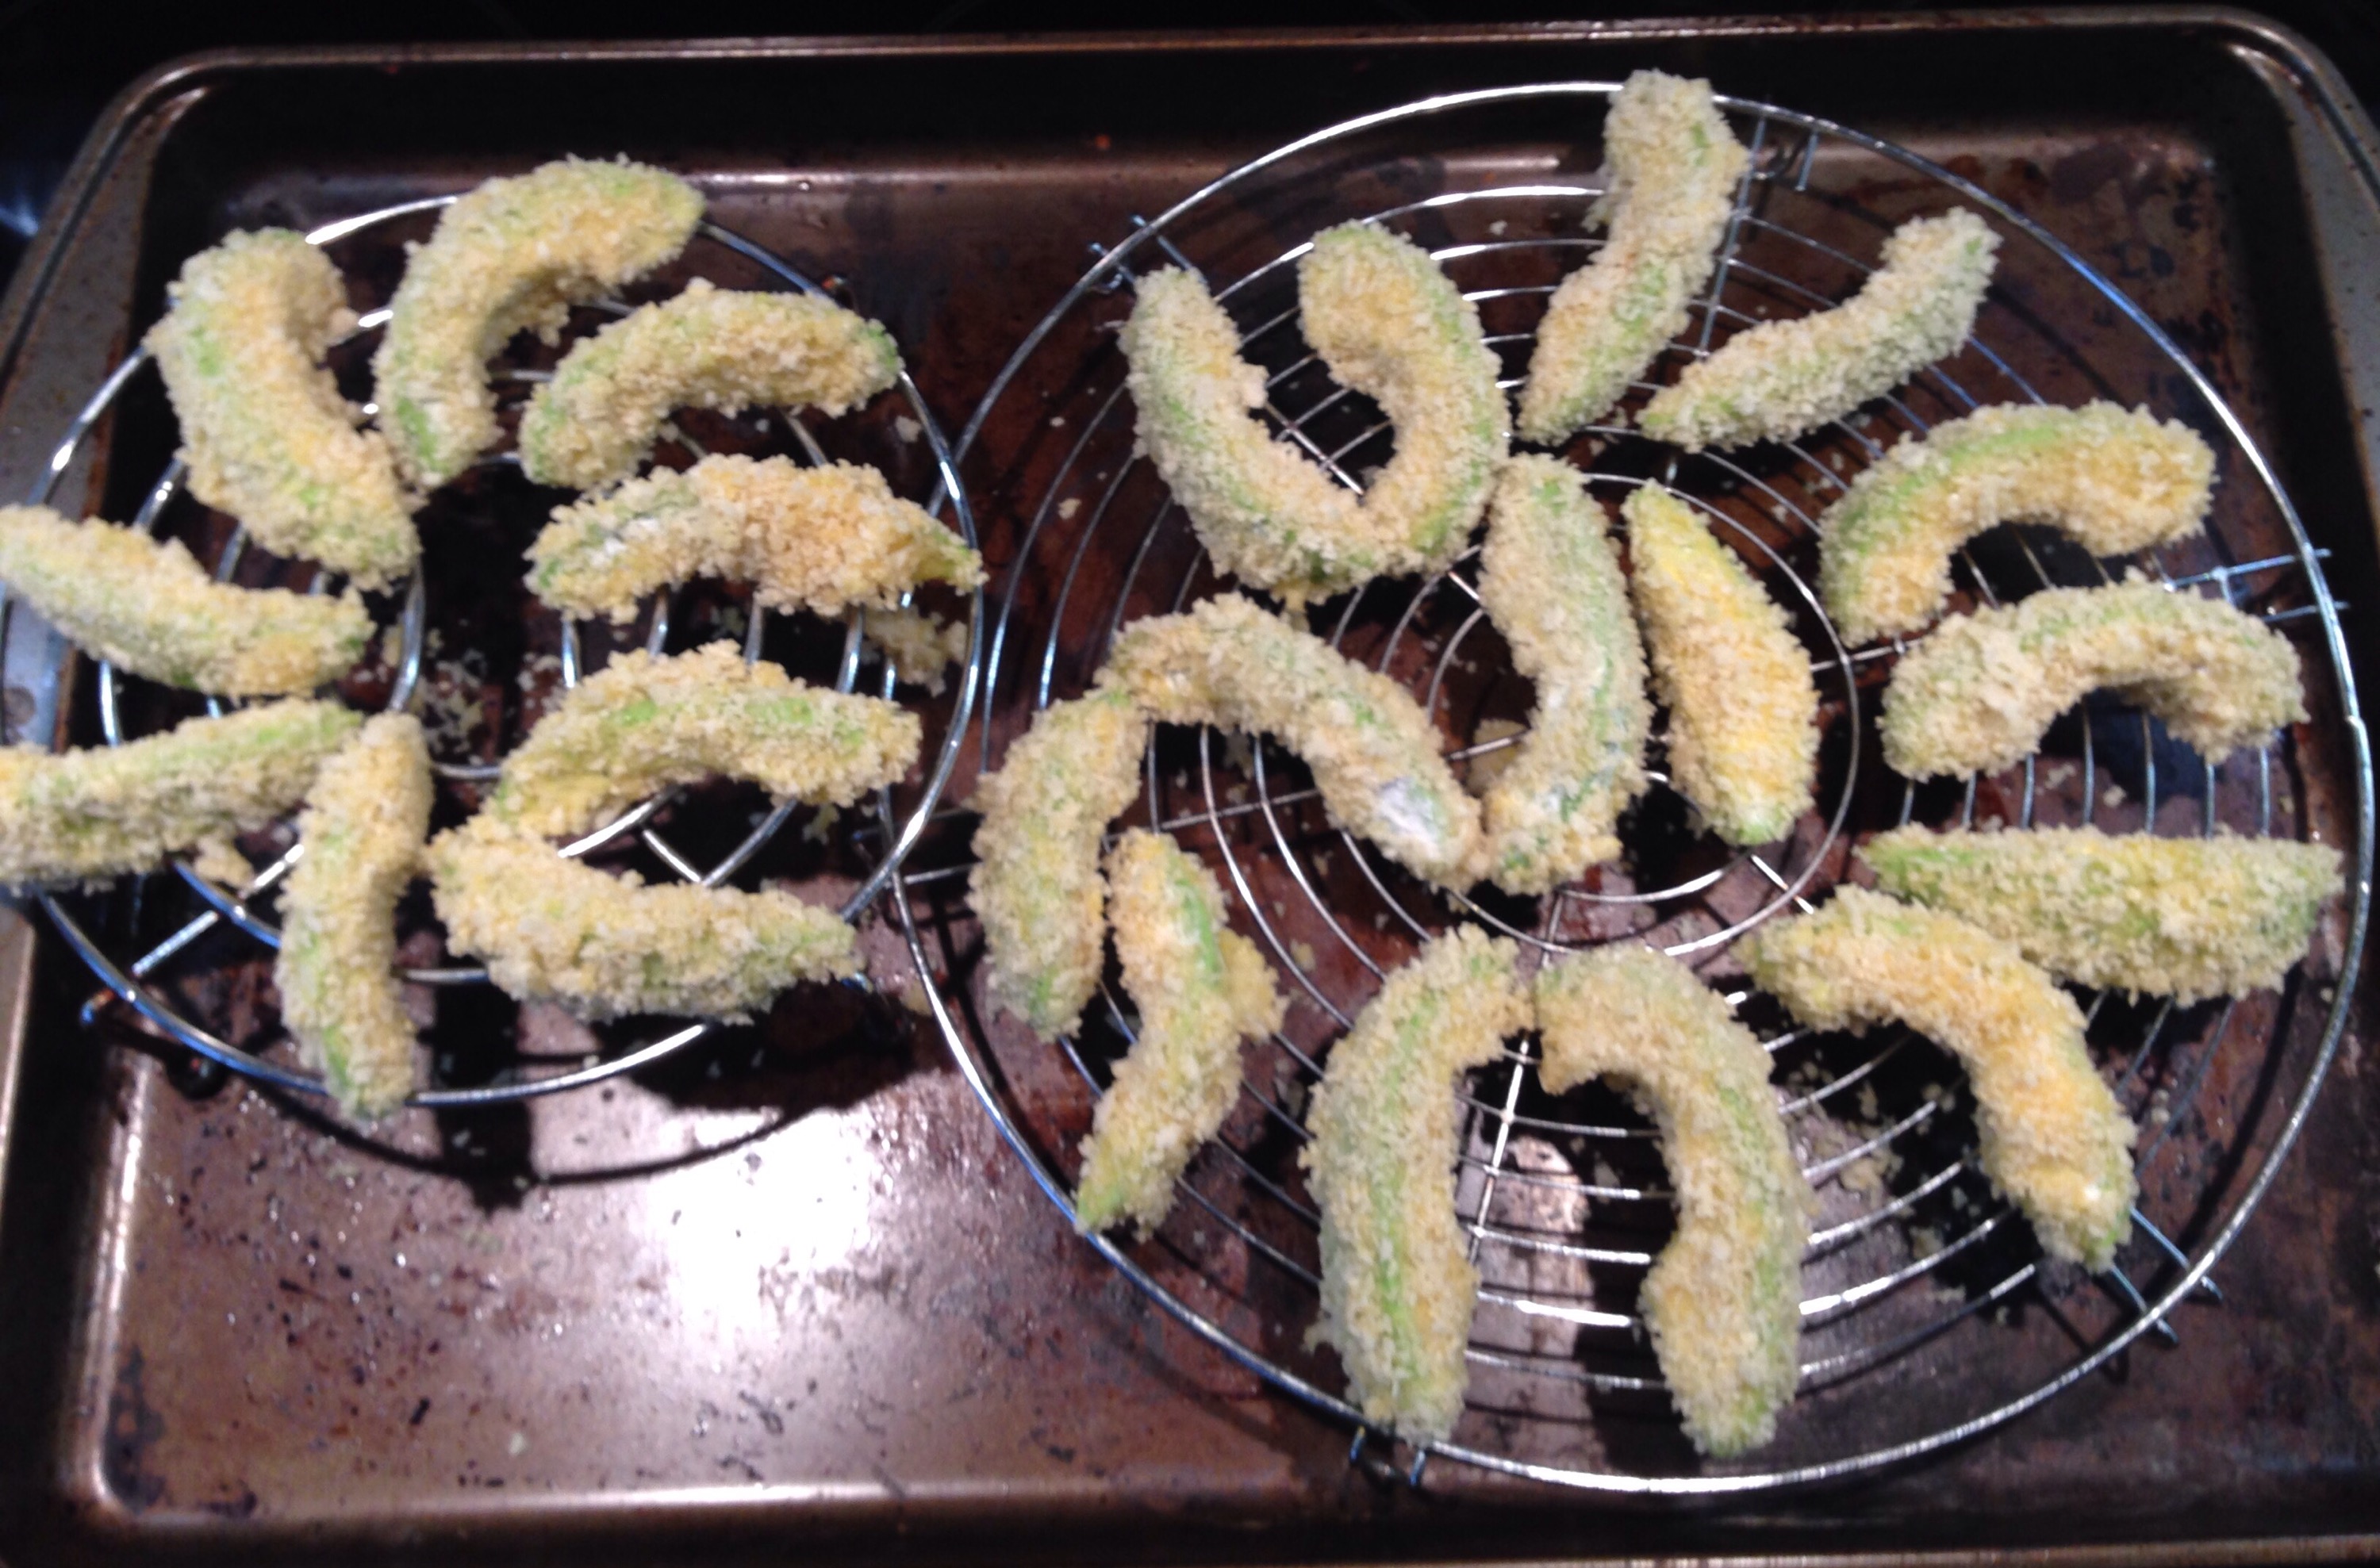
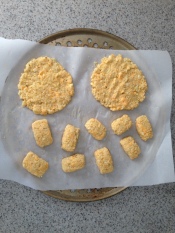
Now all you have to do is make it into fun shapes. I made it into rectangular blocks but you can also make them into balls or flat disks. I also had some left over “rice” (as you can see in the photo) so I made two small pizzas for my husband.

Next, bake it in the oven for about 20 minutes until golden. You will need to turn them mid-way.

For the pizzas, once the base is cooked, take it out and put your favourite toppings on. Then put it back into the oven just until the toppings cook and cheese melts.

This recipe is very versatile.  Add in your favourite ingredients to suit your taste buds!

Black Bean Burger

Black Bean BurgerAs a new mom who just went back into the workforce, I find it difficult to manage a decent work/life balance, especially when it comes to dinner time. Trying to feed a toddler and a picky husband can be challenging. I want something that is nutritious but not time-consuming. So I’m always on Pinterest and asking friends and coworkers for the next best (quick) recipe.

A coworker shared this recipe for a black bean burger. It’s a healthy alternative to a meaty burger, without actually looking like a vegetarian burger. So, I tried it last night, and I must say, it was fairly easy and quite yummy! My husband even approved it!

Here’s the link to the original recipe. I had a hard time finding “seasoned black beans” until I realized it could just mean “salted” but that doesn’t mean you can’t use the healthy low-sodium beans. I opted for one can, and cut the portions in half. It made about six patties. Perfect for my little family. Next time, I’ll try making a larger amount and freezing the patties between parchment paper.

You can try adding different seasonings or perhaps making it spicier with some jalapeño chunks?! Yum!!